onsdag 25. november 2015

T04 - Texturing your fish

Time to texture the fish. 

As always after done a model or object it is time to put some textures on the fish. It's critically important that you did a good job last week to save yourself a lot of trouble. I had my problems, but fortunate for me it was not any big problems. Now let's take a look at this week. 
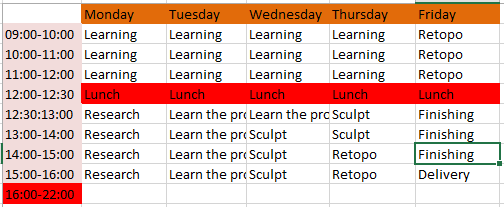
Time budget

yeah not much to say about this part.

Moodboard

So I continued a bit on my moodboard, not much because I already had much of what I needed.
Basically what you see is what you get. made the textures very much like it is on the picture. 

What and how I made it


This is all the maps I made for that week. Its NOT optimal at all, and I have gotten much feedback about this. I know now easier ways to make it better. 
I made the UV's and added a Checker map to make sure the uv's are nice and optimized. 
Most of this are actually made in mudbox. I painted on the details and at the time I was satisfied with my work. But I see now that most of this could be done better. 
The normal map is made in xNormals. Very nice program. 

This is also my final image so yeah what do you think?

M04 - Sculpting a fish in Zbrush

Assignment overview

  1. Analyze the challenge and the scope of the assignment
  2. Estimate how many hours you will spend and create a time-budget.
  3. Collect reference images for different fishes and chose one to model
  4. Sculpt the fish
  5. Retopologize your model manually
  6. Render clay renders of the sculpted model from 2 perspective views
  7. Render shaded wireframe images of the retopologized model from 2 perspective views
  8. Write a work-log that includes a time budget, research and work process
So yeah this is basically the assignment broken down to a list. So let's go trough some of it.

Analyze the challenge and the scope of the assignment. 

So this week we had to make a fish in a totally new program (for me) and it was HARD. The logic that we have learned in Maya  over the last months is NOT applied to zBrush AT ALL. It took a load of time to understand that program and make it work the way I wanted to so I could even START making that fish. 

This is zBrush. 

Estimate how many hours you will spend and create a time-budget

Not much to say about this. Didn't go just like this but very close and it always helps to have a plan.

Collect reference images for different fishes and chose one to model

I did this in the research phase and struggled to make a decision but ended with a Piranha.
Here is my references gathered into one moodboard. Not all my references made the cut. 

Sculpt the fish

The time had come and I started making sence of the program and after much struggle I finally started to make the fish the way I wanted to. 

I dont want to go closer on to all the steps but this is my final image. On the left is the sculpted model and on the right is the retopologized model. I tried to get the flowlines running, Kinda messed up the mouth but now after that I'm finished with the assignment I do know how I could make this much better. 

onsdag 21. oktober 2015

LR3 - Light and render the hard surface model

Analyze the challenge and the scope of the assignment.

I estimated how much time I would be using on this assignment. I figured I would do the render when I leave, so I could use my time most efficient. 
So this is how I planned my week. I found out I needed more time rendering then I originally thought. But I managed to use my time most efficient and had more than enough time this week. 

How 

I started with watching the DT videos and researched different HDR images. When I wast satisfied with that I started experimenting with different HDR images to see which ones would be best for my test. I did several test renders before I even started adding extra lights. When I added the lights I started working on the materials and the shaders to make them work the way I wanted to. By the time I was done with the lights I had long render times so I started working on the render settings. I managed to get the render time down to 1 min and 10 sec. But still, making 250 pictures would take time, so I desided to be satisfied with that result. 

When I was satisfied with my test renders I started a batch render and went home.
And when I got to school the next day I shuffled trough my pictures to see how they were. I did some retakes on a few pictures but I didn't have to change anything, it was just something that the render had messed up. I put the pictures together in premiere. and made a video. 

I will not publish the video here because it will take so long, but I will put up one of the pictures for you to see. 
Just imagine this rotating for 10 seconds. and then you got the end result. 

onsdag 7. oktober 2015

T03 - Texturing your hard surface model

Time planning

I used much of last week to research how I wanted my laptop to be. So I'm very happy with that because that saved me a lot of time. It is a very basic laptop, but I added some details I'm very satisfied with. This week have gone too fast! Had so much fun learning and trying out different stuff on my model. Mostly because it was "ok" to mess it up and try again, and since there was no long renders to wait for I could just go for it.

I'm satisfied how I followed my time table. And I'm happy that I'm finished now. 

I started of with making the UV's 

worst part about this week. But since I was using a normal map for my most complex shape I was able to make it very easy. I was sick on Tuesday, BUT I started taking use of OneDrive on MONDAY, I was so happy that I was able to continue my work from home, even though I was to sick to go to school. 

So I did all the UV's at home, saved and when I came to school on Wednesday I could just sit down, open my file and start wokring on some painting and stuff.

Photoshop

I took my model into Photoshop to make the basic textures and when I was happy I exported it to mudbox where I did my finishing touches. So happy we learned mudbox, It's making my life easier! 

I had a lot of work with the keyboard

At times I thought I took on too much work, but I didn't give up and I managed to make the keyboard I wanted. (I have saved it for later uses) because it was A LOT of work to make right. 

Finished product

We were not supposed to deliver any renders, just screengrabs, but I did actually render two images, just to save for myself (No high quality I'm afraid.). Take a look, what do you think? 


onsdag 30. september 2015

M03 - Hard surface Modeling

Time planning


Planning

I did not know what I would make this week, so I used half the Monday on deciding. I thought about making an airplane and made some sketches, but I changed my mind and made an gaming laptop.

I sketched a few different solutions, but in the end I had a design.
I'm not good at drawing, but I tried.


Prosess

I made a high poly object out of the bottom. Because It needed much details, and I used a whole day trying to make the normal map the way I wanted. In the end I was satisfied with the result. 
And now I know how to use mudbox better, so I'm satisfied. 

Running out of time

I'm running out of time so I'll just show you my finished product and tell me what you think.
It's a gaming computer, that's why its a bit thicker than "normal" laptops. 
As always I'm satisfied with my job, and I think I used my time well spent.

fredag 25. september 2015

LR2 - Light and Render the Environment

Been busy..

This week I have not been in class Monday, Wednesday or Thursday. So I have not been schooled in the same material as rest of my class. But I figured I had to do my best so I wouldn't be left behind. And with that in mind, lets take a look at this weeks assignment. 

Planning my time

Well there was not much time to plan. But I made a Time Table anyways. 
Not much to go on. BUT I did my best, with the knowledge I had and I'm pleased with the result. 

Framing and presentation

I chose to place the camera in the couch where I had my main shot cam from before, because of the feedback I got from our earlier delivery I figured it was the best thing to do. And the composition is great from that angle. 

Rendertimes etc.

I chose to work with very low render quality, all the way until the end. This I did because of the eternity it takes to render a image with high quality, and I really needed to save so much time as possible. I also made a work file where I smoothed every object in my scene so I could drastically lower my render times. 

Improvements

I made a fast and VERY basic fire in the fireplace. I also made the TV illuminate because it made the room feel more used. 

Lights

I added presets for my lamps because I had six of them and didn't want to do the same settings over and over again for something that should be the same settings. And I added a light in the hallway so the room would feel bigger in the night view. 
I made sure my windows worked properly and that is one of the most important things I did to my scene. It made everything so much better. It feels real in my opinion and I am very pleased. 

Finish. 

I have done the best I could with the time I had to my disposal. I tried to watch so much I could from the DT videos at home so I could learn something and I tried my best in my scene. But without further due, lets see the products. 

I'm happy with the results and I'm really starting to understand the importance of lights and shadows to make a scene feel more alive. I'm most satisfied with the night view, and I hope to learn much more and improve over time. Hopefully I will not need to rush it so much next time. 

torsdag 17. september 2015

T2 - Texturing the environment

It's time to take the environment to the next level!

New week means new project. And this week we're going to work on our environment and make textures for it. That means a lot of work, from the UV-Unwrapping to the texturing itself. The worst part about this assignment is the UV-Unwrapping. I feel like I'm really bad at it and I have a long way left to go. But somehow I manage to make it work.

So there was a bunch of stuff to do this week. Last time we were doing something like this it took me a week only to make a jewelry box. And now I had a whole room!? I did not understand how I would find the time. But as it turned out, It was not as hard as I thought!

As always, Time table

I figured I needed the Monday to re-watch some videos, get more familiar with the procedure before I started to make anything. So that is what I did on Monday. Rest of the week is basically as you see it. 

My procedural texture.

I made a procedural texture very easy. I did not know on what I was going to use it, but I figured I would start out with the couch. 

So I figured it would be nice to make a procedural texture with my couch because that would let me to get the couch nice, without any texturing artifacts or anything.
This is my couch and as you can see there is some noise (lower pictures) to make it feel more lifelike. And not so C.G. 
So all I did was to tweak the settings so that it would be the way i wanted it to be. 

How I worked.

Well, usually I am the kind of guy who starts of with the easiest bit and then tackle the harder tasks in the end. But this week I figured that I would do my utmost best to fulfill my assignment, because this did not seem like an easy task. 
 I got myself a notebook. I wrote down everything I did, with details on every UV-Map so that I could with ease make it work in PS and Mudbox. For everything I did wrong, i got a note in my book, telling myself how to fix it, and maybe not ever doing that thing again. I have learned that this is a very smart way to work.

Products:

Don't want to make this report very long, so in the end, here is my results.

And the Uv-Snapshots we needed to deliver.
Might be hard to see, but we had to deliver this aswell so.