onsdag 21. oktober 2015

LR3 - Light and render the hard surface model

Analyze the challenge and the scope of the assignment.

I estimated how much time I would be using on this assignment. I figured I would do the render when I leave, so I could use my time most efficient. 
So this is how I planned my week. I found out I needed more time rendering then I originally thought. But I managed to use my time most efficient and had more than enough time this week. 

How 

I started with watching the DT videos and researched different HDR images. When I wast satisfied with that I started experimenting with different HDR images to see which ones would be best for my test. I did several test renders before I even started adding extra lights. When I added the lights I started working on the materials and the shaders to make them work the way I wanted to. By the time I was done with the lights I had long render times so I started working on the render settings. I managed to get the render time down to 1 min and 10 sec. But still, making 250 pictures would take time, so I desided to be satisfied with that result. 

When I was satisfied with my test renders I started a batch render and went home.
And when I got to school the next day I shuffled trough my pictures to see how they were. I did some retakes on a few pictures but I didn't have to change anything, it was just something that the render had messed up. I put the pictures together in premiere. and made a video. 

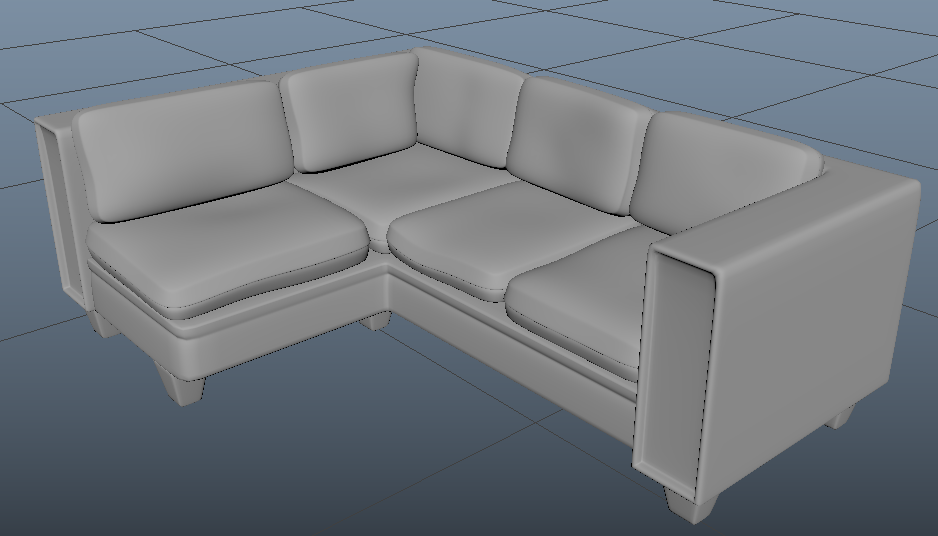
I will not publish the video here because it will take so long, but I will put up one of the pictures for you to see. 
Just imagine this rotating for 10 seconds. and then you got the end result. 

onsdag 7. oktober 2015

T03 - Texturing your hard surface model

Time planning

I used much of last week to research how I wanted my laptop to be. So I'm very happy with that because that saved me a lot of time. It is a very basic laptop, but I added some details I'm very satisfied with. This week have gone too fast! Had so much fun learning and trying out different stuff on my model. Mostly because it was "ok" to mess it up and try again, and since there was no long renders to wait for I could just go for it.

I'm satisfied how I followed my time table. And I'm happy that I'm finished now. 

I started of with making the UV's 

worst part about this week. But since I was using a normal map for my most complex shape I was able to make it very easy. I was sick on Tuesday, BUT I started taking use of OneDrive on MONDAY, I was so happy that I was able to continue my work from home, even though I was to sick to go to school. 

So I did all the UV's at home, saved and when I came to school on Wednesday I could just sit down, open my file and start wokring on some painting and stuff.

Photoshop

I took my model into Photoshop to make the basic textures and when I was happy I exported it to mudbox where I did my finishing touches. So happy we learned mudbox, It's making my life easier! 

I had a lot of work with the keyboard

At times I thought I took on too much work, but I didn't give up and I managed to make the keyboard I wanted. (I have saved it for later uses) because it was A LOT of work to make right. 

Finished product

We were not supposed to deliver any renders, just screengrabs, but I did actually render two images, just to save for myself (No high quality I'm afraid.). Take a look, what do you think? 


onsdag 30. september 2015

M03 - Hard surface Modeling

Time planning


Planning

I did not know what I would make this week, so I used half the Monday on deciding. I thought about making an airplane and made some sketches, but I changed my mind and made an gaming laptop.

I sketched a few different solutions, but in the end I had a design.
I'm not good at drawing, but I tried.


Prosess

I made a high poly object out of the bottom. Because It needed much details, and I used a whole day trying to make the normal map the way I wanted. In the end I was satisfied with the result. 
And now I know how to use mudbox better, so I'm satisfied. 

Running out of time

I'm running out of time so I'll just show you my finished product and tell me what you think.
It's a gaming computer, that's why its a bit thicker than "normal" laptops. 
As always I'm satisfied with my job, and I think I used my time well spent.

fredag 25. september 2015

LR2 - Light and Render the Environment

Been busy..

This week I have not been in class Monday, Wednesday or Thursday. So I have not been schooled in the same material as rest of my class. But I figured I had to do my best so I wouldn't be left behind. And with that in mind, lets take a look at this weeks assignment. 

Planning my time

Well there was not much time to plan. But I made a Time Table anyways. 
Not much to go on. BUT I did my best, with the knowledge I had and I'm pleased with the result. 

Framing and presentation

I chose to place the camera in the couch where I had my main shot cam from before, because of the feedback I got from our earlier delivery I figured it was the best thing to do. And the composition is great from that angle. 

Rendertimes etc.

I chose to work with very low render quality, all the way until the end. This I did because of the eternity it takes to render a image with high quality, and I really needed to save so much time as possible. I also made a work file where I smoothed every object in my scene so I could drastically lower my render times. 

Improvements

I made a fast and VERY basic fire in the fireplace. I also made the TV illuminate because it made the room feel more used. 

Lights

I added presets for my lamps because I had six of them and didn't want to do the same settings over and over again for something that should be the same settings. And I added a light in the hallway so the room would feel bigger in the night view. 
I made sure my windows worked properly and that is one of the most important things I did to my scene. It made everything so much better. It feels real in my opinion and I am very pleased. 

Finish. 

I have done the best I could with the time I had to my disposal. I tried to watch so much I could from the DT videos at home so I could learn something and I tried my best in my scene. But without further due, lets see the products. 

I'm happy with the results and I'm really starting to understand the importance of lights and shadows to make a scene feel more alive. I'm most satisfied with the night view, and I hope to learn much more and improve over time. Hopefully I will not need to rush it so much next time. 

torsdag 17. september 2015

T2 - Texturing the environment

It's time to take the environment to the next level!

New week means new project. And this week we're going to work on our environment and make textures for it. That means a lot of work, from the UV-Unwrapping to the texturing itself. The worst part about this assignment is the UV-Unwrapping. I feel like I'm really bad at it and I have a long way left to go. But somehow I manage to make it work.

So there was a bunch of stuff to do this week. Last time we were doing something like this it took me a week only to make a jewelry box. And now I had a whole room!? I did not understand how I would find the time. But as it turned out, It was not as hard as I thought!

As always, Time table

I figured I needed the Monday to re-watch some videos, get more familiar with the procedure before I started to make anything. So that is what I did on Monday. Rest of the week is basically as you see it. 

My procedural texture.

I made a procedural texture very easy. I did not know on what I was going to use it, but I figured I would start out with the couch. 

So I figured it would be nice to make a procedural texture with my couch because that would let me to get the couch nice, without any texturing artifacts or anything.
This is my couch and as you can see there is some noise (lower pictures) to make it feel more lifelike. And not so C.G. 
So all I did was to tweak the settings so that it would be the way i wanted it to be. 

How I worked.

Well, usually I am the kind of guy who starts of with the easiest bit and then tackle the harder tasks in the end. But this week I figured that I would do my utmost best to fulfill my assignment, because this did not seem like an easy task. 
 I got myself a notebook. I wrote down everything I did, with details on every UV-Map so that I could with ease make it work in PS and Mudbox. For everything I did wrong, i got a note in my book, telling myself how to fix it, and maybe not ever doing that thing again. I have learned that this is a very smart way to work.

Products:

Don't want to make this report very long, so in the end, here is my results.

And the Uv-Snapshots we needed to deliver.
Might be hard to see, but we had to deliver this aswell so. 


fredag 11. september 2015

M02 - Modeling an environment

This week

This week we are going to make an environment. We had to consider a story behind the scene so here is my story.

My house

I tried to picture a bit how I want to have my house so I started to picture my room. I wanted a fireplace because of the warm feeling I get when I see a lit fireplace with the amazing sound the logs give when they are really dry. So my story for my environment is basically the story of me. Or at least how my living room would have been if I got everything the way I wanted. 

I live in the suburbs, with my wife and two kids. And we use this living room all the time. That is basically the story for my environment. 

Analyze the challenge and scope of the assignment

I first started looking trough my task and figured out all the things I had to make. We had to make at least 5 different objects of a similar style and use them to design the room. So that was my first objective, figuring out what I wanted to use in my room.
This is some sort of bench to have stuff on, and put stuff into.

I made several lamps to lighten the room.

A couch, need a place to sit.

What is a living room without a TV?

And something to put the TV on. 

Time planning

I Planned what I would do and when on Monday.

This week I actually managed to follow my schedule very well. There was some overtime on Tuesday and Wednesday because I was very afraid not to meet the deadline. But I managed to do everything and now I am writing the report before handing it in. 

Curves/Splines

I used Curves to make detail for one of my windows. Because I felt that it did not fit so many other places. Atleast with the design I was aiming for. But I really wanted an awesome window like that so, I figured the best place to put it, had to be where it would be nice to have it. 


 I made the curves like this.


And then I started tweeking the settings so that it would fit the way I wanted it to fit. 

The product

As always I want to show you the finished product. 
This is how it looks when you enter the room

This is how it looks from the couch and looking out in the room. 


 This is only a clay render of my room, because we are not going to texture it until next week. So next week you will see a much nicer room. It needs color, and i saddens me that I cant do that now :( But it is for the best to wait and see what our next assignment is before doing anything else to screw this up.

Leave a comment! 

David

torsdag 3. september 2015

LR1 - Light and Render the Jewelry box

New week new assignment! 

This week we worked on lighting and rendering. I had no clue how hard it would be to get this right. I made many mistakes in the beginning, and did not have a clue of what I was doing. But in the end I learned much and started to actually understand what I was doing, I'm glad we're going to go trough this again in some weeks because I feel there is still much I need to learn to really understand this, but now I feel that I understand enough and I am very happy with my finished product.

I made a time-budget. I didn't follow this very much because it was very hard to learn and understand everything this week, but I managed to use my time very well and I am pleased with my time management. 
                     A very basic time-budget. It is nice to have my time planned in an orderly fassion.

We had to research 3 point light setup for our assignment and what is looks like.

As you can see there is three cameras. One key light, fill light and one back light. 
There was many things to take into consideration when I started to work with my product and I am very glad, now that I'm finished that I took the time and prepared with good research and really took the time to analyze the assignment before I jumped into this. 

We did some drawings this week and it really helps to learn about drawing, because I am really bad at it. I feel improvements every time we learn new things. I really hope we are going to learn more about it. (They are still so bad that I'm not going to publish them here)

I tweaked many settings to get the final look of my finished product. I totally turned of the shadows on my back light, it didn't feel natural with it on. I changed the colors on my lights to simulate more warmth and I believe I managed to make it like I wanted. 
Here you can see my settings for my key light. The part you cant see is:
Shadow Rays:64 and Ray Depth Limit: 3 

I feel like this was the best settings I could manage to get. And I am really happy with my end result. 
The picture is really dark all over, but in the dark there is this very nice, old jewelry box that is still standing after all this time. I feel that the lights and the whole scene is set up nice for the feeling I want people to get out of this picture. 

I optimized the settings and my average render time with this quality was 3 Minutes and 51 Seconds. But when I was working on the box I had an average of 30 seconds of render time. I only used enough quality to see what I was doing and how every thing I did changed my picture. I didn't use this quality until I was sure I was finished with my product. 

Below you can see my finished product with the best possible quality I could make out of it. 
I dont know how the quality will be because I dont have much experience with blogg and stuff but I hope you can see the details. 

Leave a comment and tell me what you felt when you saw my box :)